Push в ios приложениях
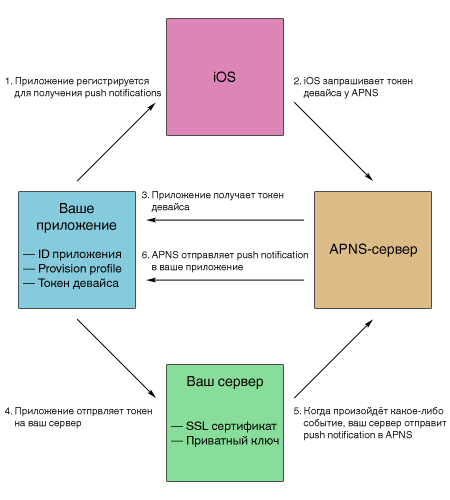
Коротко как работают push уведомления для ios(подробная статья тут)
Мобильное приложение iOs.
Для того, чтобы подключить push сообщения, необходимо добавить в AppDelegate
Для ios7:
- (BOOL)application:(UIApplication *)application didFinishLaunchingWithOptions:(NSDictionary *)launchOptions
{
#if !TARGET_IPHONE_SIMULATOR
    [application registerForRemoteNotificationTypes:
     UIRemoteNotificationTypeAlert | UIRemoteNotificationTypeBadge | UIRemoteNotificationTypeSound];
#endif
    application.applicationIconBadgeNumber = 0;
Для ios8:
- (BOOL)application:(UIApplication *)application didFinishLaunchingWithOptions:(NSDictionary *)launchOptions
{
#if !TARGET_IPHONE_SIMULATOR
    //-- Set Notification
    if ([[[UIDevice currentDevice] systemVersion] floatValue] >= 8.0)
    {
        [[UIApplication sharedApplication] registerUserNotificationSettings:[UIUserNotificationSettings
settingsForTypes:(UIUserNotificationTypeSound | UIUserNotificationTypeAlert | UIUserNotificationTypeBadge)
categories:nil]];
        [[UIApplication sharedApplication] registerForRemoteNotifications];
    }
    else
    {
        [[UIApplication sharedApplication] registerForRemoteNotificationTypes:
         (UIUserNotificationTypeBadge | UIUserNotificationTypeSound | UIUserNotificationTypeAlert)];
    }
#endif
application.applicationIconBadgeNumber = 0;
Добавляем прием сообщений:
- (void)application:(UIApplication *)application didReceiveRemoteNotification:(NSDictionary *)userInfo {
    application.applicationIconBadgeNumber = 0;

    // We can determine whether an application is launched as a result of the user tapping the action
    // button or whether the notification was delivered to the already-running application by examining
    // the application state.

    if (application.applicationState == UIApplicationStateActive) {
        // Nothing to do if applicationState is Inactive, the iOS already displayed an alert view.
        UIAlertView *alertView = [[UIAlertView alloc] initWithTitle:@"Внимание!"
                                                            message:[NSString stringWithFormat:@"%@",
                                                                     [[userInfo objectForKey:@"aps"] objectForKey:@"alert"]]
                                                           delegate:self
                                                  cancelButtonTitle:@"OK"
                                                  otherButtonTitles:nil];
        [alertView show];
    }
}
Необходимо зарегистрировать устройство. Для этого в AppDelegate добавляем:
#pragma mark Remote notifications

- (void)application:(UIApplication *)application didRegisterForRemoteNotificationsWithDeviceToken:(NSData *)deviceToken {
    // You can send here, for example, an asynchronous HTTP request to your web-server to store this deviceToken remotely.
    NSLog(@"Did register for remote notifications: %@", deviceToken);

    NSURLSessionConfiguration *configuration = [NSURLSessionConfiguration defaultSessionConfiguration];
    NSURLSession *session = [NSURLSession sessionWithConfiguration:configuration];
    NSURL *url = [NSURL URLWithString:@"http://your_site/reg_client_device"];
    NSMutableURLRequest *request = [NSMutableURLRequest requestWithURL:url
                                                           cachePolicy:NSURLRequestUseProtocolCachePolicy
                                                       timeoutInterval:60.0];

    NSString *noteDataString = [NSString stringWithFormat:@"token=%@&os=%@&version=%@&language=%@",
                                deviceToken,
                                @"ios",
                                [[[NSBundle mainBundle] infoDictionary] objectForKey:@"CFBundleVersion"],
                                [[NSLocale preferredLanguages] objectAtIndex:0]];

    [request setHTTPMethod:@"POST"];
    request.HTTPBody = [noteDataString dataUsingEncoding:NSUTF8StringEncoding];


    NSURLSessionDataTask *postDataTask = [session dataTaskWithRequest:request completionHandler:^(NSData *data, NSURLResponse *response, NSError *error) {
        //NSLog(@"Data: %@", data);
        //NSLog(@"Responce: %@", response);
        if(error)
            NSLog(@"Can't register device. Error: %@", error);
    }];

    [postDataTask resume];


}

- (void)application:(UIApplication *)application didFailToRegisterForRemoteNotificationsWithError:(NSError *)error {
    NSLog(@"Fail to register for remote notifications: %@", error);
}
Или с помощью AFNetworking
#pragma mark - Remote notifications

- (void)application:(UIApplication *)application didRegisterForRemoteNotificationsWithDeviceToken:(NSData *)deviceToken {
    // You can send here, for example, an asynchronous HTTP request to your web-server to store this deviceToken remotely.
    NSLog(@"Did register for remote notifications: %@", deviceToken);

    NSString *urlAsString = [NSString stringWithFormat:@"%@%@", DOMAIN_NAME, @"api/devices"];

    AFHTTPRequestOperationManager *manager = [AFHTTPRequestOperationManager manager];
    NSDictionary *parameters = @{@"device_token": deviceToken,
                                 @"device_os": @"ios",
                                 @"device_lang": [[NSLocale preferredLanguages] objectAtIndex:0],
                                 };

    [manager POST:urlAsString parameters:parameters success:^(AFHTTPRequestOperation *operation, id responseObject) {
        NSLog(@"Register device.");
    } failure:^(AFHTTPRequestOperation *operation, NSError *error) {
        NSLog(@"Can't register device. Error: %@", error);
    }];


}

- (void)application:(UIApplication *)application didFailToRegisterForRemoteNotificationsWithError:(NSError *)error {
    NSLog(@"Fail to register for remote notifications: %@", error);
}
Со стороны мобильного приложения больше ничего делать не надо. Переходим к серверу.
Сертификаты (для сервера и приложения).
1) Необходимо создать app Id с разрешенными push
2) настроить ssl сертификат. Для этого переходим в app id Edit-> Config SSl Cert
3) Чтобы сгенирировать для сертификата ключ, открываем сязку ключей Связка Ключей -> Ассистент Сертификации -> Запросить сертификат у бюро сертификации (выбираем сохранить на диске)
4) полученный файл загружаем в member center SSL Cert
5) скачиваем сгенерированный сертификат
6) Приватный ключ переводим в формат p12. Для этого заходим в Связку Ключей выбираем Вход и Ключи, на личном ключе правой кнопкой мыши -> экспортировать
7) Преобразовываем .cer в .pem сертификаты. В терминале:
openssl x509 -in aps_development.cer -inform der -out PushSECert.pem
8) Преобразуем ключ p12 в pem
openssl pkcs12 -nocerts -out PushSEKey.pem -in PushSEKey.p12
9) Объединяем сертификаты
cat PushSECert.pem PushSEKey.pem > ck.pem
10)Тестируем
telnet gateway.sandbox.push.apple.com 2195
openssl s_client -connect gateway.sandbox.push.apple.com:2195 -cert PushSECert.pem -key PushSEKey.pem
Размещаем сертификат на сервере.
Сервер.
Для начала нужно написать api для регистрации устройств.
Создаем таблицу (например, MySql):
CREATE TABLE `device` (
  `device_id` int(11) NOT NULL AUTO_INCREMENT,
  `device_token` varchar(255) NOT NULL,
  `device_os` varchar(100) NOT NULL,
  `device_lang` varchar(100) NOT NULL,
  PRIMARY KEY (`device_id`)
) ENGINE=InnoDB  DEFAULT CHARSET=utf8 AUTO_INCREMENT=1 ;
У меня админская часть написана на Yii2, поэтому для написания api я использовала его.
С помощью gii я сгенерировала модель Device на основе созданной таблицы.
Создала контролер DeviceController на основе ActiveController (подробней почитать можно тут )
<?php

namespace app\controllers\api;

use Yii;
use app\models\Device;
use yii\rest\ActiveController;
use yii\web\Response;

/**
 * DeviceController implements the CRUD actions for Device model.
 */
class DeviceController extends ActiveController
{
    public $modelClass = 'app\models\Device';
    public $serializer = [
        'class' => 'yii\rest\Serializer',
        'collectionEnvelope' => 'device',
    ];
    public function behaviors()
    {
        $behaviors = parent::behaviors();
        $behaviors['contentNegotiator']['formats']['application/json'] = Response::FORMAT_JSON;
        return $behaviors;
    }
    public function actions()
    {
        $actions = parent::actions();

        // disable the "delete" and "create" actions
        unset($actions['delete'], $actions['index'], $actions['options']);
        // customize the data provider preparation with the "prepareDataProvider()" method
        return $actions;
    }

    public function afterAction($action, $result)
    {
        $result = parent::afterAction($action, $result);

        // your custom code here
        if($action->id == 'create' || $action->id == 'update')
        {
            $i = 0;
            foreach ($result as $singleResult) {
                if(isset($singleResult['message']))
                {
                    $singleResult['success'] = false;
                    $singleResult['error_code'] = $this->getErrorCodeForActionId($action->id);
                    $result[$i] = $singleResult;
                }
                else
                {
                    $result = array($result);
                    break;
                }
                $i++;
            }
        }
        $result = array('device' => $result);
        return $result;
    }
    function getErrorCodeForActionId($actionId)
    {
        switch ($actionId) {
            case 'update':
                return 1;
            case 'create':
                return 2;
            default:
                return 0;
        }
    }
}
Так как в iOS deviceToken имеет такой вид:
<xxxxxxxx xxxxxxxx xxxxxxxx xxxxxxxx xxxxxxxx xxxxxxxx xxxxxxxx xxxxxxxx>,
а для push нужен без пробелов и <>, пришлось немного отредактировать сгенерированную модель:
<?php
namespace app\models;

use Yii;

/**
 * This is the model class for table "device".
 *
 * @property integer $device_id
 * @property string $device_token
 * @property string $device_os
 * @property string $device_lang
 */
class Device extends \yii\db\ActiveRecord
{
    public static function tableName()
    {
        return 'device';
    }

    public function rules()
    {
        return [
            [['device_token', 'device_os', 'device_lang'], 'required'],
            [['device_token'], 'unique'],
            [['device_token'], 'string', 'max' => 255],
            [['device_os', 'device_lang'], 'string', 'max' => 100]
        ];
    }

    public function attributeLabels()
    {
        return [
            'device_id' => 'Device ID',
            'device_token' => 'Device Token',
            'device_os' => 'Device Os',
            'device_lang' => 'Device Lang',
        ];
    }
    public function beforeValidate()
    {
        if($this->device_os == 'ios')
            $this->device_token = str_replace(array(' ', '<', '>'), '', $this->device_token);
        return parent::beforeValidate();
    }
}
Осталось написать отправку push сообщений на определенные устройства.
Для iOS я использую библиотеку ApnsPhp github.com
Для Google — класс GCMPushMessage github.com
Эти библиотеки я разместила в basic/vendor/push.
В файле basic/web/index.php необходимо добавить пути к этим библиотекам:
//before add yii
require_once ( __DIR__ .'/../vendor/push/ApnsPHP/Autoload.php');
require_once ( __DIR__ .'/../vendor/push/GCMPushMessage.php');

require(__DIR__ . '/../vendor/autoload.php');
require(__DIR__ . '/../vendor/yiisoft/yii2/Yii.php');
Созданный ранее сертификат я добавила в basic/web/cert/ckDev.pem
В класс модели Device я добавила метод
public function sendOnePush($messageTitle='Push', $message='Push')
    {
        //ANDROID PUSH
        if($this->device_os == 'android')
        {
            $apiKey = "your_api_key";


            $devicesAndroid = array();
            array_push($devicesAndroid, $this->device_token);

            $gcpm = new \GCMPushMessage($apiKey);
            $gcpm->setDevices($devicesAndroid);
            $response = $gcpm->send($message, array('title' => $messageTitle));

            $push_android = new Push();
            $push_android->push_date = date("Y-m-d H:i:s");
            $push_android->push_os = 'android';
            $push_android->push_title = $messageTitle;
            $push_android->push_text = $message;
            $android_result = json_decode($response, true);
            $push_android->push_state = 'Успешно отправлено: '.$android_result['success']
            .'. Не получилось отправить: '.$android_result['failure'];
            $push_android->save();
            //die(var_dump($push_android->getErrors()));
            return true;
        }

        //IOS PUSH
        if($this->device_os == 'ios')
        {
            $push = new \ApnsPHP_Push(
                \ApnsPHP_Abstract::ENVIRONMENT_SANDBOX,
                'cert/ckDev.pem'
            );
            $push->setProviderCertificatePassphrase('your_cert_password');
            // Set the Root Certificate Autority to verify the Apple remote peer
            //$push->setRootCertificationAuthority('cert/entrust_2048_ca.cer');
            $push->connect();

            $messageAPNs = new \ApnsPHP_Message();
            $messageAPNs->addRecipient($this->device_token);

            // Set a custom identifier. To get back this identifier use the getCustomIdentifier() method
            // over a ApnsPHP_Message object retrieved with the getErrors() message.
            $messageAPNs->setCustomIdentifier("Message-Push-Update");

            $messageAPNs->setText($message);
            $messageAPNs->setSound();
            // Set the expiry value to 30 seconds
            $messageAPNs->setExpiry(30);

            $push->add($messageAPNs);
            $push->send();
            $push->disconnect();

            // Examine the error message container
            $aErrorQueue = $push->getErrors();
            if (!empty($aErrorQueue)) {
                var_dump($aErrorQueue);
            }

            $push_ios = new Push();
            $push_ios->push_date = date("Y-m-d H:i:s");
            $push_ios->push_os = 'ios';
            $push_ios->push_title = $messageTitle;
            $push_ios->push_text = $message;
            if (!empty($aErrorQueue)) {
                $push_ios->push_state = var_dump($aErrorQueue);
            }
            else
                $push_ios->push_state = 'Push был отправлен';
            $push_ios->save();
            //die(var_dump($push_ios->getErrors()));
            return true;
        }
        return false;
    }
Для примера создам кнопку, при нажатии на которую будет отправляться push на определенное устройство.
//in view
<?= Html::a('SendTestPush', ['send-push', 'id' => $model->device_id], [
            'class' => 'btn btn-default',
            'data' => [
                'confirm' => 'Are you sure you want to send push?',
                'method' => 'post',
            ],
        ]) ?>

//in controller
public function actionSendPush($id)
    {
        $device = $this->findModel($id);
        $device->sendOnePush('Test push', 'Test push');

        return $this->redirect(['index']);
    }